Using live viewing
Echoview detects and lists Echolog applications running on the network in the Live viewing dialog box ![]() . On the Shortcut menu (right-click) of the Live viewing dialog box, you can Start live viewing or Stop live viewing from a listed Echolog application. Echoview can manage one live viewing EV file for each Echolog application listed and any number of non-live viewing EV files.
. On the Shortcut menu (right-click) of the Live viewing dialog box, you can Start live viewing or Stop live viewing from a listed Echolog application. Echoview can manage one live viewing EV file for each Echolog application listed and any number of non-live viewing EV files.
Live viewing ceases when:
- the EV file for live viewing is closed or Echoview is closed
- the Echolog application is closed (on closing, the Echolog application is removed from the list within the Live viewing dialog box)
- Echoview can not communicate with the Echolog application e.g. one of the above situations occur or a machine/network failure occurs
- Stop live viewing is selected on the Shortcut menu of the Live viewing dialog box.
Notes:
- If a paired Echosim application is stopped while the Echolog application continues, the display of live viewing data pauses in Echoview. The display of live viewing data resumes when the Echosim application is restarted.
The following sections describe the use of live viewing in Echoview:
Access shared directories when live viewing
Start live viewing automatically
Access shared directories when live viewing
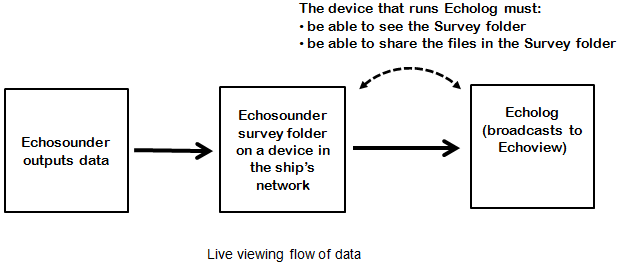
Echoview's Echolog applications facilitate live viewing by reading echosounder (output) data files and sending the data to Echoview for display. The About Echolog and Using Echolog pages discuss the use and setup of the Echolog utilities.
The live viewing feature can provide an additional monitoring station on a ship. To set this up, configure the sharing of directories or folders on the network with the device (laptop or similar) that runs Echoview live viewing.
Configuration issues may include:
- the ship's network firewall (consult the ship's network system administrator)
- the device's firewall (consult the device's system administrator)
- the sharing settings of echosounder data files in the network's "survey" folder so that the Echolog application can access them
Echoview and Echolog applications run under Microsoft Windows systems. When logging and live viewing on different computers you can experience sharing difficulties. Specifically, on the live viewing computer you may see a message saying that Echolog is running, but the folder is not shared. To set up sharing settings on the logging computer:
- (On the device hosting the Survey folder) Browse to the Survey folder using Windows Explorer.
- Share the folder (the process differs depending on the operating system see table below).
- Restart Echolog after sharing a folder to ensure the broadcast of the 'shared' folder is sent to Echoview.
- Test the share by browsing to \\yourcomputername\sharefoldername in Windows Explorer with the device that runs Echolog.
- If it works, update Echolog's survey folder to the same folder location as Step 3.
- Live viewing on the remote computer should now work.
Microsoft Windows folder sharing settings
Microsoft Windows operating systems support the sharing of folders (and the files in them). You can configure Windows settings so that computers can see each other and access shared folders. This involves mapping a network drive and sharing a folder or folders. Microsoft disseminates topics dealing with file sharing techniques.
Start live viewing automatically
Upon Echoview start up, you can automatically start live viewing. This is useful with a live viewing template.
To setup Echoview to automatically display variables when Echolog is detected:
-
On the File menu, choose Configuration.
-
On the Echoview Configuration dialog box, click the Live Viewing page.
-
Select Automatically start live viewing when a logger is detected.
-
Click OK.
An EV file will be automatically created and named. Use the Filesets window to display desired echogram data. EV files created from Echolog logging data are by default named: Live Viewing - hhmm dd MMM yyyy-ComputerName.EV
EV file management
Echoview provides the option of automated EV file management during live viewing. This feature creates multiple smaller EV files and data files rather than a single, potentially huge EV file. You enable automated EV file management and enter related settings on the Live Viewing page of the Echoview configuration dialog box.
Warning: If automated EV file management is not enabled, the file(s) being logged will continue to grow until they exceed available memory and Echoview will eventually crash as a result. Echoview Software strongly recommends you enable automated EV file management and that you enter settings that limit file size to that level that will not exceed the memory available on the logging computer.
Live viewing templates
If a live viewing template has been created Echoview will display windows in live viewing with the display and processing settings saved in the template. Echoview will also create any virtual variables in the live viewing EV file that have been created in the template file.
To create a live viewing template:
-
Create or open an EV file using data files of the same type as the files you will be live viewing (for example, use .ek5 files if you are going to live view with Echolog 500).
-
Adjust EV File Properties and Variable Properties as required.
-
Create virtual variables if required.
-
Save the EV file to the Live Viewing templates folder.
You must name your live viewing template file correctly, or it will not be applied to your live viewed data:
- If you are using Echolog 500 and viewing .ek5 files then the live viewing template must be named default-500.EV or computername-500.EV.
- If you are using Echolog or Echolog 60* to live view .RAW data files directly from an Ex60 echosounder (that is, you do not have data compression enabled) then you must name the live viewing template default-60-RAW.EV or computername-60-RAW.EV.
- If you are using Echolog or Echolog 80* to live view Simrad EK80 .RAW data files then the live viewing template must be named default-80.EV or computername-80.EV.
- If you are using Echolog 60* to live view compressed data in the .EK60 data format then you must name the live viewing template default-60-EK6.EV or computername-60-EK6.EV.
- If you are using Echolog to live view Sound Metrics DIDSON .ddf data files then the live viewing template must be named default-DIDSON.EV or computername-DIDSON.EV.
- If you are using Echolog to live view Sound Metrics ARIS .aris data files then the live viewing template must be named default-ARIS.EV or computername-ARIS.EV.
- If you are using Echolog to live view BioSonics .dt4 data files then the live viewing template must be named default-DT4.EV or computername-DT4.EV.
- If you are using Echolog to live view Kongsberg Mesotech M3/Flexview .imb/.nnn data files then the live viewing template must be named default-M3.EV or computername-M3.EV.
Note: *Echolog 60 and Echolog 80 are no longer installed post Echoview 10. If you require them, please contact the Echoview support team (support@echoview.com).
See Using live viewing templates for further details.
Live export
The Live export operator may be used where Echoview is used remotely and data is sent to local network for assessment. Live export is designed to work while live viewing in Echoview, and to work smoothly with COM live viewing support. The Live export operator incrementally exports its data in real time to a file during live viewing. The operator is best used in a live viewing template's dataflow, with the variable you wish to export data from assigned to Operand 1. Live export settings specify file location and other optional file parameters. See also: Live Export: GPS note.
Contact support@echoview.com for further information.
Live viewing virtual variables
Echoview performance while live viewing virtual variables is affected by the:
- amount of raw data
- arrival frequency of raw data
- number of virtual variables in the dataflow for the displayed virtual variable
- computational intensity/complexity of virtual variables in the dataflow for the displayed virtual variable
- capabilities of the computer system
The live viewing of multibeam virtual variables may stretch Echoview and system limits. A considered value for the Echolog setting Live viewing broadcast interval(s) may give Echoview time to complete computations before the next stream of raw data arrives.
Adding new data during live viewing
During live viewing, expect a perfomance lag from operators that must recalculate—due to an open echogram for that variable, adding a data file, receiving new data or during an export. Refer to Adding new data to an existing virtual variable for the list of operators.
Notes
- Operators like IIR filter, FIR filter and Kovesi Image Denoising have high computational needs.
- The design of the Merge pings operator confers stability over performance, resulting in slower operation during live viewing.
- During live viewing, Region statistic recalculation for new data becomes progressively slower.
- Virtual variables that make use of a window of pings for calculation are designed to process only when a full window of pings is available during live viewing. As a result, during live viewing such a displayed echogram lags by a window of pings.
- Some operators (for example Convolutions and Cell Statistic) calculate the value of a ping using data from pings that come after it. When live viewing, new data is repeatedly being added at the end. Those pings whose values would be changed by the new data are not displayed. For Convolution variables, the last ëKernelWidth/2û* pings are omitted. For the Cell statistic variable, pings from incomplete intervals are omitted.
Live viewing data in 2D
All echograms, (selected) editable lines, rectangular selections, the Calibration Assistant, school detection, region classification after school detection, linked graphs, members of an auto-synchronization group and cruise tracks which are affected by data which arrives during live viewing will be updated automatically. Also available is a user-defined keyboard shortcut to create a marker region for the last ping.
The setting Log a heartbeat while live viewing on the Live Viewing page of the Echoview Configuration dialog box enables automated systems to detect and confirm that Echoview is currently running and live viewing.
Notes:
- Note: Detect school performance while live viewing
- Performance, virtual variable dataflows and the operator calculation window
- Echoview Configuration settings for live viewing
- Selection advance during live viewing
Live viewing data in 3D
3D cruise tracks and echogram curtains with the Live update option set which are affected by data which arrives during live viewing will be updated automatically.
Multibeam data in echograms and the 4D window which are affected by data which arrives during live viewing are updated automatically. To display the latest live viewing ping move the time slider to the far right.
See also
Live viewing dialog box
Survey Suite module
Solution to live viewing problems
Echoview configuration dialog box
About Echolog applications
*Floor function ëxû gives the largest integer less than or equal to x.